Dipping into Birria: House of Birria

After my exams in Transportation Law, we decided to wind down by watching something off Netflix. Scrolling through the genres but found nothing of interest until Kat suggested “How about something food-related?” So I clicked on Food and Travel then ended up watching ‘The Taco Chronicles’. We ended up watching more than half of all its episodes and finished the rest today. Aside from some new insights on ingredients, flavors, and culture, we found ourselves craving some tacos. 

After the birria episode from last night, I asked Kat if there are any restaurants serving birria here in Metro Manila and apparently, there are many. We ended up ordering in a small Arroz de Birria, Premium Beef Birria Tacos, and two Horchata de Arroz from the House of Birria.

Before describing our experience, what is Birria anyway? Its wikipedia page defines it as “a traditional ancestral soup or stew made from a combination of chili pepper-based goat meat adobo, garlic, cumin, bay leaves, and thyme, and cooked at a low heat. Not to be confused with barbacoa, which is cooked underground, birria is slow-stewed in a pot (olla). Beef, lamb or sheep are alternatives for goat. It may be seasoned and garnished with onion, cilantro, and lime.”

Arroz de Birria

The Arroz de Birria was simply divine with the well-cooked beef mixed in with fluffy rice, a runny sunny-side-up egg, and hints of spices that can be attributed to the Mexican palate. The taste of it had some heat, a splash of savory, and fresh acidity. This dish was served with some lemon, salsa, and sour cream on the side.

Premium Beef Birria Tacos

The Premium Beef Birria Tacos were a godsend. It had a crispy taco shell and was stuffed with fresh cabbage, juicy and tender pulled beef, and a small layer of cheese on the bottom for some structural integrity. The scent of the accompanying mildly-spiced birria soup, also known as consomme, wafted through the air when I opened the container in all its slow-cooked goodness. 

With a squeeze of lemon and some salsa onto the taco, it was game on after I dipped the taco into the soup and dug in. It invigorated my tastebuds with the symphony of the savory beef, the sweetness and acidity from the tomatoes, the sourness from the lemons, and the heat from the birria soup. Four bites later, the taco had disappeared from my hand. Four more bites and my share of two tacos were all out.

Since there was some birria soup remaining, I poured some of it into the last of the Arroz de Birria. It made an excellent dish even better by ramping up all the flavors while complementing the creaminess of the sour cream and egg.

The Horchata de Arroz would have been a good accompaniment but I forgot to bring itout of the fridge until we woke up from the taco food coma. The vanilla and cinnamon notes from the rice drink would have really refreshed the palates after the meal. 

Overall, we’d order again from House of Birria soon. When the pandemic’s over, we’ll visit and dine in to experience the taco de birria fresh from the kitchen.

Married Cooking: I’d like my Balatinaw champorado, please

Balatinaw champorado with boneless dilis

Champorado (chocolate rice porridge) is a childhood memory for many Filipinos, me and Kat included. I remember that when my grandmother would make some for me and my siblings, she used sticky/malagkit rice, tablea (a ball of ground-up cacao beans), and evaporated milk or powdered milk. While I have been hankering for some champorado for quite some time now, I couldn’t justify buying sticky rice for just us two here at home for only one dish. Of course, life has a way of throwing a curveball by leading the both of us to read about Balatinaw rice and champorado.

Balatinaw is one of the many heirloom rice varieties that come from Ifugao. This is a black glutinous rice that smells and tastes like chocolate when it’s cooked. It is a rare treat to get our hands on this kind of rice here in Metro Manila because of limited supplies.

A sobering fact about our country’s gastronomic reality is that heirloom rice varieties like Balatinaw are in danger of disappearing entirely due to several factors:

  1. Ifugao rice is hand-cultivated from start to finish
  2. There is little to no awareness from locals on the existence of these varieties of rice
  3. The influx of imported and mass-produced white rice makes it cost-prohibitive to compete with heirloom rice. 

Despite these problems, there are some places where one can get heirloom rice varieties from places like the Rice Terraces Farmers Cooperative, and Terraces Bounty

In our case, we got ours from Rural Rising PH when they made a snap buy post that they were selling 5kg of Balatinaw rice. A little over a week later, Typhoon Fabian (International Name: In-fa) created an opportunity to try cooking some champorado and I used Lutong Fili_pinay’s champorado recipe as a guide.

The ingredients in her champorado recipe are:

  • 1 cup of sticky/malagkit rice
  • 1 liter of water
  • ¾ cup of brown sugar
  • ¾ cup of cocoa powder
  • A pinch of salt
  • A can of evaporated milk

Team Glasses Tweaks:

  1. Balatinaw rice instead of sticky rice
  2. Grated 6 thumb-sized bars of unsweetened Ricoa chocolate
  3. Condensed milk, instead of evaporated milk
  4. 1 tablespoon of brown sugar
  5. Instead of adding salt, I placed dried fish on top of the champorado
    1. Danggit (sun-dried and salted rabbitfish)
    2. Boneless Dilis (sun-dried anchovy)

How to make Balatinaw champorado:

  1. Rinse the Balatinaw rice to remove any dirt or sediment
  2. Once clean, place the rice in a pot and pour in the water. The rice should be fully submerged.
  3. Cook the rice over high heat and simmer until the water reaches a rolling boil
  4. Lower the heat and simmer for 10 to 15 minutes, stir occasionally until it achieves a thick consistency.
  5. In a separate bowl, combine the grated chocolate and brown sugar.
  6. Pour in the chocolate-sugar mixture into the thickened rice until the mixture is fully incorporated.
  7. Take the champorado off the heat and serve in a bowl. Add some condensed milk to taste and top with fried dried fish.
    1. For danggit, fry over medium to medium-high heat for 2 minutes on each side until lightly brown. Place on a paper towel or strainer to remove the excess oil.
    2. For dilis, fry over medium heat for around 15 to 20 seconds then place on a paper towel or strainer to remove the excess oil.
Balatinaw champorado with danggit

It was a spoonful of happiness in every bite during the cold and stormy weather at home. We hope that more people will cook with heirloom rice varieties like Balatinaw or use other local ingredients like kamias or budbud to bring them back into our daily lives and meals.

Please let us know what you think of this recipe in the comments below.

Ratatouille a la Provencale

Yes, this is ratatouille, the very same dish that features in the Pixar film of the same name. It’s easy to see why the chef Collette called it a “peasant dish”, and why the characters actually upgrade the ratatouille to make what is properly called Confit Byaldi, which is a twist on the original ratatouille. Confit Byaldi involves arranging the vegetables in a beautiful pattern within a pan lined with a sauce called piperade, then baking the entire dish till the vegetables are delicately roasted to perfection. The original ratatouille though is a stovetop creation, and we do get to see it in a flashback scene in the movie.

We put off making ratatouille for a while owing to the time it takes to put it together. However on this lazy weekend when our friend Trisha gave us some vegetables, including two plump zucchinis, we knew exactly what we had to do.

I suspect that there are as many ratatouille recipes in Provence as there are cooks or chefs who make it. The recipe we used was compiled by our favorite French culinary editor/gourmet Curnonksy in “Traditional Recipes of the Provinces of France.” This is the same book where we found our recipe for soupe aigo-saou, another Provencal dish.

Curnonksy’s ratatouille recipe serves six hungry people. We adjusted the portions however to serve two.

Ingredients

  • 2 small eggplants
  • 4 green peppers
  • 6 tomatoes
  • 4 zucchini
  • 2 onions
  • 2 cloves garlic
  • 5 tablespoons olive oil
  • salt and pepper

Team Glasses Tweaks: Aside from using fewer vegetables since we were not cooking for 6, we chose red peppers as opposed to green peppers. We also used more garlic as a matter of taste.

Making Ratatouille

  • Chop all the vegetables into small pieces.

Tip: They do not necessarily have to be in round slices, but we chose this shape because it’s pretty. A mandolin slicer may come in handy here. We also soaked the eggplant slices in salted water for a few minutes to remove that slimy bitter taste that sometimes comes with this vegetable. This is a trick we learned from the Pasta Grannies!

  • Put all the vegetables into a pot. Add olive oil, salt and pepper.

Tip: Don’t just drizzle the olive oil and seasonings on top of the vegetables. Add the olive oil spoonful by spoonful, and stir between spoons. Do the same when adding salt and pepper to taste.

  • Add 1/2 cup cold water to the vegetables

Tip: Does this look like too little water? Actually it isn’t. The vegetables will let out a lot of liquid while being cooked, and this will make quite a thick and rich sauce. More water can be added if using more vegetables or if a thinner sauce is desired.

Cover the vegetables and let simmer for 90 minutes over very low flame. Cook the vegetables until very tender.

Tip: What about induction cookers? This dish can be cooked at a 80-100 degrees Celsius setting. 80 is perfect for that slow simmer but 100 may be needed if working with a lot more vegetables and water.

  • Serve the ratatouille hot, in bowls. Sliced bread is a great side to this to mop up the delicious sauce at the bottom.

Cooking this was quite an experience. Not even 20 minutes after setting this to simmer, we could smell that crisp scent that can only be produced by very fresh vegetables stewing at just the right temperature. This aroma pervaded the apartment, and probably even the hallway, until it was time to eat.

I had the pleasure of sitting back and tucking into my bowl of ratatouille, and remembering exactly why one of my beloved character iterations has to eat this dish at least once a year. As for Lee, who never had ratatouille before…he ended up staring into space, contemplating the mysteries of the universe, and wore an expression exactly out of *that* scene in the Pixar movie.

Yes it takes time to cook. It’s worth it. It’s healthy. May everyone’s tastebuds never be the same again.

Married Cooking: Scrambled Red Rice and Tofu

We usually have two to three types of proteins along with some vegetables for variety on our weekly grocery list. This time around, we had some tofu on hand. While our Mapo Tofu recipe is great, it was time to scour our cookbooks for a change. After a while, we found the recipe for Scrambled Poha Rice from V Street by Rich Landau and Kate Jacoby, but we had to make some tweaks because we didn’t have many of the ingredients on hand.

The ingredients for their Poha Rice recipe are:

  • 1 cup chopped tomatoes
  • 2 tbsp cilantro leaves
  • 2 tbsp + ½ cup of finely diced red onions
  • ½ tsp minced garlic
  • ½ tsp minced ginger
  • 1 tbsp ketchup
  • 1 tbsp sriracha
  • ½ tbsp olive oil
  • 2 tsp curry powder
  • ½ tsp cumin
  • ¼ tsp cayenne pepper
  • 1 ½ tsps sea salt
  • 1 cup poha
  • 8 oz firm tofu
  • ⅛ tsp turmeric
  • 1 cup vegetable stock
  • ¼ tsp freshly ground black pepper
  • ½ tsp Latin Spice Blend
  • 1 tsp nutritional yeast
  • 1 tbsp sunflower oil
  • 1 tsp cumin seeds
  • 1 tbsp vegan butter

For the Latin Spice Blend:

  • 2 tbsp paprika
  • 2 tbsp cumin
  • 2 tbsp granulated garlic
  • 2 tbsp granulated onion
  • 1 tbsp salt
  • 1 tbsp freshly ground pepper
  • 2 tsp dried oregano
  • 2 tsp dried thyme
  • 1 tsp cayenne
  • 2 tsp chipotle powder
  • 1 tsp coriander
  • ¼ tsp ground cloves

Team Glasses Tweaks:

  1. Changed Poha rice with Red rice
  2. Only used our olive oil on hand
  3. Used more cumin powder and curry powder since we didn’t have ketchup, sriracha, cayenne, turmeric, and cumin seeds
  4. Replaced the vegan butter with actual butter
  5. No nutritional yeast, granulated garlic, granulated onion, dried thyme, chipotle powder, coriander, and ground cloves for the vegetable stock.
  6. Didn’t have a food processor, so I chopped it all by hand.

How we made the Scrambled Red Rice and Tofu:

  1. Cook the red rice first by washing the rice twice and placing a ratio of 1 cup rice for 2 cups of water, then cook on a medium-low heat for around 15 minutes or until the liquid is nearly gone and the rice is somewhat fluffy.
  2. While the rice is cooking, start on the tomato chutney by combining the chopped tomatoes, cilantro, two tablespoons of red onion, ginger, garlic, olive oil, ½ teaspoon of curry powder, cumin powder, and ¾ teaspoon of salt. It is much better to pulse this chutney in a food processor until the herbs are lightly torn for a consistent and smoother chutney.
  3. In another bowl, place the tofu, teaspoon of curry powder, and the rest of the salt then mash it together by hand until the tofu is coated well.
  4. Using a separate container, whisk the vegetable stock with the remaining curry powder, pepper, and Latin Spice Blend together until the spices are incorporated into the stock.
  5. On a pan, pour in some olive oil over medium-high heat and saute ½ cup of the diced red onions until translucent. Add in the tofu mixture and stir around occasionally until the tofu is yellow and with some golden brown on the sides.
  6. Add in the butter and red rice then cook for three more minutes.
  7. Pour in the vegetable stock mixture after and bring to a boil. Scrape up the brown bits stuck underneath so it doesn’t burn. 
  8. Transfer the rice mixture into two bowls in equal portions and garnish with the tomato chutney to serve.

We’ll definitely try this one again with the complete ingredients since this managed to replace beef giniling and rice as one of Kat’s favorites. 

Please let us know what you think of this recipe in the comments below.

Mushroom Carbonara — what to do with “mushroom meat”

Mushroom Carbonara — what to do with “mushroom meat”

One of our forays into online groceries landed us with a whole container of “mushroom meat” –or essentially wood mushrooms as meat substitutes. Most of our cooking experiences with this type of mushroom have been with shitake mushrooms, but other wood mushrooms such as trumpet mushrooms are also readily available, at least in vegan/vegetarian stores. With such a large quantity of mushroom meat from The Vegan Grocer Ph, we had more than enough for several dishes…or failed experiments. True to the saying “third time’s the charm”, this third attempt at cooking with mushroom meat came out better than we expected. 

Mushroom Meat set out to defrost

We derived this recipe from Molly Baz’s take on mushroom carbonara. Of course, we made some revisions based on what was on hand in the kitchen. 

Team Glasses Tweaks: 

  1. Instead of using button mushrooms, we used the mushroom meat
  2. We used spaghetti noodles instead of orecchiette
  3. We omitted the shallots and parsley. 

Ingredients list: 

  1. Mushroom meat (several handfuls only)
  2. 4-5 garlic cloves (more if desired)
  3. Spaghetti noodles (or another pasta shape if desired)
  4. Olive oil
  5. 3 eggs
  6. Black pepper
  7. Salt
  8. Grated parmesan cheese

How to Cook This Dish

  1. Soak the mushroom  meat for about half an hour, then rinse thoroughly. This helps reduce the “earthy” flavors of the wood mushrooms. After rinsing the mushrooms, chop them as desired. 
  2. Start cooking the pasta. Make sure to save pasta water when draining it. 
  3. In a separate bowl, beat the eggs and grated parmesan cheese together to form a smooth sauce. Stir in black pepper. Set aside. 
  4. Smash and mince the garlic. 
  5. In a large pan heat the olive oil and pour in the mushrooms. Cook till the mushrooms are browned and have released quite a bit of their liquid. This may take about 15 minutes. 
  6. Lower the heat and stir the garlic into the mushrooms. Cook until the garlic’s aroma is released, and the garlic is softened. Season with salt and pepper
  7. Stir in the cooked pasta and about a cup of the pasta water into the mushrooms. Toss to coat the pasta and reduce the liquid. Take the pan off the heat and let cool for a minute. 
Tossing the pasta and mushrooms
  1. Get another cup of the pasta water and stir it into the reserved egg and cheese mixture till smooth. Then pour the egg and cheese sauce over the pasta and mushrooms. Toss till the noodles are coated in this thick sauce, adding more pasta water if necessary. 
  2. Season with salt if needed, serve immediately with more grated parmesan and freshly ground pepper. 

Total cooking time: About an hour, counting the soaking of the mushrooms. 

It is quite possible that this recipe would go well with other meat substitutes that would give a better flavor balance (without any need for soaking or other prior preparations). Nut-based cheese can be substituted too for this recipe.

Now off to munch!

Married Cooking: Fried Chicken Pandan

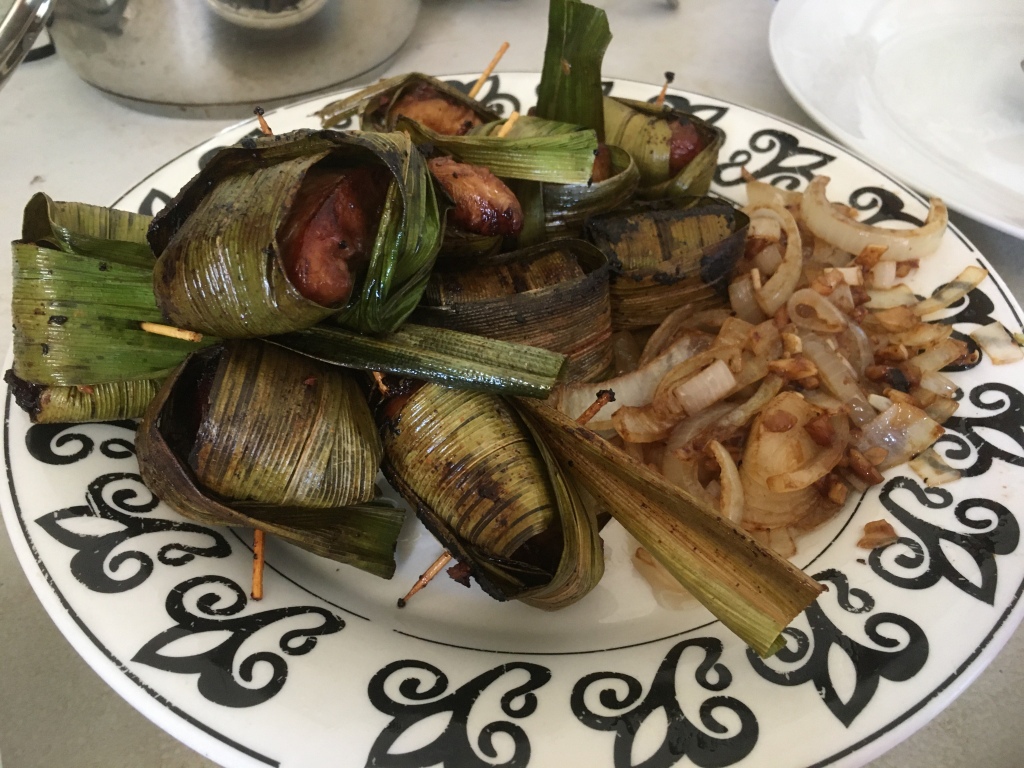
Fried Chicken Pandan
Fried chicken pandan and some fried onions on the side

In a random burst of impulsiveness while buying our groceries from COOP grocer, I decided to order in some pandan leaves, thinking it might just be a few manageable leaves. I ended up with several large leaves of pandan, which is great but at the same time, I ran out of ideas on what to do with them aside from adding it while making rice. Hence, finding Chef Tatung from Simpol’s 2019 Fried Chicken Pandan recipe.

The ingredients for the recipe are:

  • 700 grams chicken thigh or leg fillets 
  • 3 cloves garlic, minced
  • 1 teaspoon ginger, grated 
  • 1 tablespoon oyster sauce
  • 2 tablespoons calamansi juice 
  • 1 teaspoon ground black pepper
  • 2 tablespoons cornstarch 
  • Pandan Leaves (of course)
  • Cooking oil (bought some cheaper oil for deep frying this time)

Some toothpicks are also needed during the preparation part. 

For this one, here are the differences in how I’ve made it:

  1. I forgot to use black pepper on this one. 
  2. I used boneless chicken breast fillets, and chopped them into three parts. In hindsight though, I should have just chopped it into two.
  3. Used the alternative to oyster sauce he suggested, which is soy sauce and brown sugar mixed together on a separate container first before adding it into the marinade.
  4. Only had lemons on hand instead of calamansi.
  5. I also forgot to take off the toothpicks.

How I made the Pandan Fried Chicken.

  1. Marinade
    1. In a bowl, combine the chicken, soy sauce and brown sugar mixture, lemon juice, ginger, garlic, and cornstarch.
    2. Let it marinade for at least 15 minutes or even overnight.
  2. Preparation
    1. Roll the marinated chicken with a pandan leaf
    2. Turn the leaf to the other side
    3. Secure the chicken and pandan with a toothpick. It should look like a pocket.
  3. Fry
    1. Pour the cooking oil into the pan and set it to medium heat.
    2. Once the oil is hot enough, place the chicken pandan into the pan. It should vigorously bubble once the chicken is in the oil.
    3. When the bubbling has subsided somewhat, flip the chicken pandan to the opposite side.
    4. Once the bubbling has subsided and the chicken’s exterior is somewhat golden brown, take it off the pan and place on a kitchen towel to drip off the excess oil.
    5. After a few minutes, place these on a plate, take off the toothpicks, and serve.

In my experience, it goes well with some freshly cooked rice and some great company. The Fried Chicken Pandan was succulent and juicy while crisp on the outside, with a hint of sweetness from the pandan leaf.

Please let us know what you think of this recipe in the comments below.

Candied oranges in a condo

Usually my go-to for anything sweet is a bar of chocolate, or its liquid variant in a cup. Sometimes though, I find myself looking for something a little more fruity to cleanse my palate after the very flavorful meals that Lee is so fond of cooking.

Enter in this venture into making candied oranges. This idea stemmed from a long-standing unfinished story of mine, wherein a side character habitually made candies of her orchard’s fruits to send miles away to her son, the workaholic protagonist of this tale. I figured that I’d have an easier time than my 19th century inspiration with turning a bunch of kiat-kiat oranges into sweets.

The ingredients:

  • Fresh oranges
  • A whole pot of water, enough to cover the oranges
  • White sugar at a ratio of 1 cup of sugar to 1 cup of water

Some notes:

  • The type of orange matters, as not all have peels that lend as easily to being candied. Small oranges are also more easily prepared and cooked in this process
  • White sugar is a must; it can be the table sugar variety or confectioner’s sugar.

How to make candied oranges

  1. Optional step: Peel your oranges. I did this, not knowing if kiat-kiat peels are even edible. Some people would also like to remove the white threads around the oranges, just for a smoother texture.
  2. Slice the oranges crosswise, with each slice being about 1/8th of an inch thick. Remove seeds if present.
  3. Combine the sugar and water in a large pot and set to boil. Stir to help dissolve the sugar
  4. Drop all the orange slices into the pot. They will float, so it is important to make sure that they are covered somewhat.
  5. Lower the heat so that the mixture is kept at a simmer. Cover and let it be for about 45-50 minutes, stirring every 15 minutes to keep the orange slices coated.
  6. When the orange slices are somewhat translucent, remove them from the syrup and set to dry on a plate covered with parchment paper or paper towels. The best option though is a wire cooling rack!
  7. Leave the orange slices to dry thoroughly, then roll in sugar. Store in a dry container or in the refrigerator.

Owing to the lack of space and a cooling rack, I opted to dry the candied slices on a plate. This didn’t dry out the fruit as well as I expected, hence they ended up making more syrup of their own when I rolled the pieces in sugar. Nevertheless there is nothing wrong with storing these candies in syrup, as seen above. I suppose that my character, with a full sized kitchen at her disposal, would have had less trouble drying and cooling her fruits.

What to do with the excess syrup eft from cooking? It can be added to desserts, used to top pancakes, mixed into liquers, or just about anything needing an orange flavor.

THE VERDICT: The resulting candy had the consistency of a gummy bear, but with a much more natural and subtle flavor. As Lee described it, the natural fruity sweetness of the orange was retained even with the candying process. I enjoy the fact that the tartness of the orange was abolished somewhat, leaving behind a cleaner taste on the palate. I will definitely do this again!

Soupe Aigo-Saou

After several weeks of rich chicken and beef dishes, it was about time that we at Team Glasses ventured into cooking that would be lighter on the palate. For our week of easy and light fare, we bought more vegetables as well as a packet of fish fillets. On one of the weeknights when it was my turn to cook, I decided to try out another French recipe known as soupe aigo-saou. 

Soupe aigo-saou also hails from Provence, the same region that has given the world that famous seafood soup known as bouillabaisse. Soupe aigo-saou is also made with fish, but is less complicated to put together than its renowned counterpart. The recipe, as documented in “Traditional Recipes of the Provinces of France” by Curnonsky, requires the following fresh ingredients to serve 4-6 persons: 

  • 2 pounds white fish
  • 1 sliced onion
  • 2 chopped tomatoes
  • 6 potatoes cut into quarters
  • 1 and a half tablespoons salt
  • A dash of pepper
  • 2 cloves crushed garlic
  • Bouquet garni (this recipe calls for parsley, celery, and a bay leaf)
  • Slices of bread
  • Olive oil

I made a few alterations to this list, thanks to the availability of ingredients in our little kitchen: 

  • The recipe doesn’t specify what kind of white fish is best to use for this soup. I went with using tilapia for this soup, owing to its delicate flavor. 
  • In lieu of chopped tomatoes, I used about two tablespoonfuls of ready made tomato sauce. If there had been passata on hand this week, that would have been a great alternative too. 
  • I changed the bouquet garni to include the following: basil, rosemary, and a single bay leaf. 
  • In lieu of French bread…we used monay sliced into halves. 
  • Owing to some mischief involving our pepper mill and a very curious cat, I had to use garlic powder for further seasoning later in the recipe.

Now on to make the soupe aigo-saou!

  1. Prepare the bouquet garni. A traditional French bouquet garni is made from fresh herbs tied together with a fine string before being added to a soup or stock. Since we had dry herbs on hand, I simply tied them up in a gauze ‘spice bag’. 
  2. Slice the fish into bite sized chunks. Arrange in a pot with the garlic, onions and potatoes, season with salt and pepper. Add enough water to cover all the fish and vegetables, and then some. Add the bouquet garni and the tomato sauce. Boil all of this for about 20 minutes. 
  3. Arrange the bread slices in soup bowls, allotting about two for each person. Pour some olive oil over each slice and then season well with pepper (or garlic powder in this case). 
  4. Once the soup is done, pour some of the soup liquid over the bread in each bowl. Serve the fish and potatoes separately. 

The French would also suggest serving the fish and potatoes with a homemade aioli or garlic mayonnaise. 

How did this take on soupe aigo-saou turn out? We found that the sweetness of the monay bread went very well with the mildly tart flavors of the soup. Lee has declared this dish to be perfect for adding into our repertoire of rainy day fare. Its simplicity and ease of preparation definitely make it a plus for our weekdays! 

Provencal chicken: poulet mistral le prieure

In which it all comes down to the garlic

One thing that Lee and I share as far as early childhood experiences are concerned is growing up with garlic as a kitchen staple. Both our families simply could not do without garlic in most meals. It was only natural that this affinity should be carried over into our studio apartment kitchenette, requiring us to stock up regularly on this spice for all our kitchen endeavors, both familiar and experimental. It was only a matter of time till my curiosity about all things French would lead me to try out food from Provence, specifically this one dish with a name that could only come from that part of the Midi. 

This dish, at least under this particular name, has been documented in “Bistro Cooking” by Patricia Wells. I thought at first that this dish was named for the cold northwestern wind that blows from the Rhone Valley to the Meditteranean, which helps give Provence its distinctive climate. As it turns out, this dish has a somewhat more literary naming story, and has been said to be named for the French poet Frederic Mistral (1830-1914). 

Other iterations of this recipe go by the name “chicken with 40 cloves of garlic” (translated roughly into poulet aux quarante gousses d’ail)…for reasons we will soon find out. 

The recipe that Mme. Wells has documented requires the following ingredients: 

  • 2 tablespoons extra-virgin olive oil
  • 1 tablespoon unsalted butter
  • 1 whole chicken, rinsed and divided into 8 serving pieces
  • Salt and freshly ground black pepper
  • 40 large garlic cloves
  • ½ cup dry white wine (Cassis is recommended for this one)
  • ½ cup chicken stock, preferably homemade

We made the following tweaks for reasons of space, time and economy: 

  • Instead of a whole chicken we simply got chicken drumsticks. We’ve also tried this recipe with chicken thighs, which work just as well. 
  • We had to omit the wine. Using cooking wine or wine vinegars is a no-no!
  • Instead of chicken stock we found some vegetable bouillon, which we dissolved in a cup of hot water
  • We used about 25 cloves of garlic. 

How to make poulet mistral le prieure: 

  1. Peel all the garlic first. Please do not use pre-peeled garlic for this, as much of the flavor will be lost before cooking. This is the most laborious step, but it is worth it. 
  2. Season the chicken beforehand with salt and pepper. Let sit a few minutes
  3. Heat the oil and the butter in a deep frying pan or skillet. When this mixture is hot, add the chicken pieces and cook on one side till golden brown (but not scorched). Turn over to brown on the other side; this usually takes about 5 more minutes. 
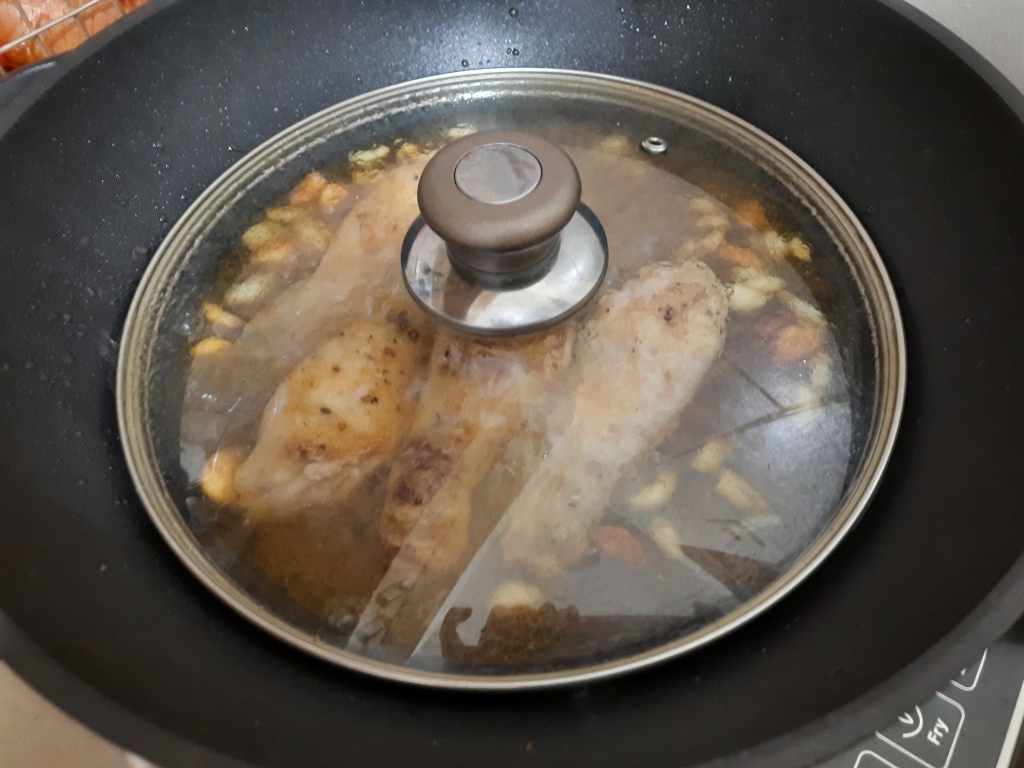
  4. Lower the heat to the medium setting. Add the garlic cloves to the pan. For maximum flavor nestle the garlic cloves in a single layer under the chicken pieces. Saute while shaking the pan frequently to keep the garlic from getting scorched. Keep this up till the garlic is lightly browned and the garlic aroma has been released. 
  5. Slowly add in the stock and the wine (if using it). Shake the pan and scrape up any bits of garlic that have stuck to the bottom. 
  6. Cover everything and let it all simmer for about 10-15 minutes, till the juices run clear when pricking a piece of chicken. 

This dish can be served on top of hot rice or potatoes. Personally I think that this would also go well with bread, which can be dipped in the garlic sauce. Contrary to what one may think, the garlic flavor is not overwhelming at all; the taste permeates the chicken very subtly. This dish has become a favorite of mine to make owing to its relative simplicity. Hopefully with more time and space for prep, I can try out more dishes from this iconic French region, and expand our culinary experiments a little further. 

Slow Cooker Chili Con Carne

Slow Cooker Chili Con Carne

One unexpected addition to our kitchen plethora last Christmas was a slow cooker with a capacity of two quarts. Since on most days our meals are the sort that have to be prepared in that brief space between the cat’s dinner time and the  garbage collection, we had to allocate a lazy weekend just to be able to use this new piece of equipment. After some going back and forth on the best meats to put in this pot, we decided to put a decadent but GERD friendly twist to one of our favorites: chili con carne

Most chili recipes are designed to be cooked in under an hour, with the meat being swiftly seared then stewed for some time in its juices and tomato sauce. There is something to be said though for slow cooking meat in such a way that all the fats and flavors just come out and mingle. With this in mind, we set out to try making chili…the slow way. 

Ingredients: 

  • One-fourth kilo of ground beef. Alternatively one can use a tender cut of meat such as loin but minced or sliced very finely. 
  • About fifty grams of beans (or less). Although red kidney beans are frequently used with chili, we opted to use white beans instead. Pinto beans would be especially good with this one though. 
  • 3 rashers of bacon, diced. We used nitrite free, smoked bacon. 
  • One small white onion, chopped
  • Several cloves of garlic (according to taste), minced
  • Cumin powder
  • Paprika
  • Salt and pepper
  • Tomato sauce or passata. We had half a bottle of homemade passata left for this recipe
  • Olive oil

Making the chili

  • Soak the beans in water the night before, or for at least 8 hours. Drain before cooking. 
  • In a little olive oil, fry the bacon till crisp. Set the bacon to drain on a plate with a paper towel, save the drippings in the pan.
  • Saute the onion and then the garlic in the bacon drippings. Once the onion has caramelized and the garlic fragrant and light brown, add in the beef just to brown it. Season with salt and pepper to taste. There should be no pinkish bits left after this quick sear. 
  • Put the beef mixture in the slow cooker, add in some cumin powder and paprika, according to your taste. Mix very well to coat all the beef.
  • Add in the drained beans, mix well. Top with the crisp bacon
  • Cover everything with the tomato sauce or passata. If the mixture looks too dry, then add about half a cup to a cupful of water. 
  • Set the slow cooker to “high”, or to cook for about four hours. 
  • Take a nap, cook rice, enjoy the fragrance of the chili slowly stewing. 
  • Serve over hot rice or over warm tortilla chips with cheese. This tastes even better when stored and rewarmed for the next day. 

We omitted adding very hot chilis or peppers for this recipe owing to our health concerns. But should this not be a problem, options for extra heat include: 

  • Sweet bell pepper sliced with the seeds removed. This can be cooked with the onions, garlic, and beef prior to popping into the slow cooker
  • A dash of chili powder when adding in the passata
  • Roasted sili, chopped with the seeds removed. The sili can be roasted at home for a few minutes, then chopped before adding into the beef mixture while cooking or into the slow cooker while adding the beans and bacon
  • Jalapenos, sliced. If using canned jalapenos, drain first! 

We ended up with enough chili for dinner as well as lunch the next day. A great advantage of slow cooking this way is that this is “lutong tamad”, literally just put it in the pot and leave it. This is best for a weekend afternoon wherein there are things that need to get done, but there is a need to make enough food for the week’s lunches. 

Best part? We didn’t need to get the antacids out after this round of cooking. Yay!